Natural Hair Essentials To Buy Right Now


If you follow @TheSassyNation on Snapchat, then you're ahead of the game and aware that everybody's favorite natural hair care line, Shea Moisture, has been on promo at Walgreens for a few weeks now. Last week it was a BOGO half off situation. This week it's get 3 for the price of 2. IDK how much longer they'll stay on promo, this is the third week so far. I actually copped mines last Saturday. It seemed like the perfect time to stock up on their Jamaican Black Castor Oil (JBCO) infused Strengthen, Grow & Restore shampoo and conditioner.

I've been having great success with moisture retention using JBCO and other products that use it as a key ingredient. So when I saw that Shea Moisture expanded the JBCO line to include a few stylers, such as the Edge Treatment, I decided to give it another try. 

I've only used the JBCO conditioner and masque in the past, but didn't care for it because I couldn't use it as a leave in, since it seemed to dry my hair out. It wasn't until I later examined the content that I discovered it's conditioner has got protein listed pretty close to the top of it's ingredients list. Hence, the drying effect as a result of prolonged use (as in a leave in). For my hair, this is a no-no, and should be avoided unless the intent is to follow up with a moisturizing treatment.

However, my hair has been severely lacking protein and until recently I'd forgotten about this line and what it could be used for. So in addition to restocking it to restore my protein balance. I also got the cult fave Aubrey Organics GPB Balancing Protein Conditioner.

Now, about Aubrey Organics... When I first started my natural hair journey I was obsessed with only using products that were natural. This line was one of a handful that not only had a variety of products that worked, but was accessible on the ground in stores like Whole Foods. 

I remember talking to the regional reps at the ALIVE! trade show about how wildly popular their products were in the natural hair community. They had no idea why they couldn't keep up their hair conditioners on the shelves. I explained to them that most naturals washed their hair primarily with conditioner and used shampoo sparingly.

So, when I found out from my local health food store that one of the co-founders was recently deceased and they'd been manufacturing and distributing way below the norm, I figured I'd better stock up. If you use Aubrey Organics and are having trouble getting your hands on, really, anything in the product line (lotions, soaps, etc.), you may want to consider stockpiling a few things as well.

In the meantime I plan to resume my normal routine of using this specific conditioner as a part of my 2-step deep conditioning process, which I wrote extensively about here. Let's just say having both protein and moisturizing conditioners in one's curly hair arsenal and knowing when to use which is critical, yet very easy to learn. For now, here's a quick look at the result from my dry twistout using that JBCO edge gel. As expected, moisture levels are waaayy up, I feel blessed! :) 

Add @TheSassyNation on Snapchat
 

Talk back: What are your go-to holy grail moisture or protein-rich products? Leave a comment below or on social. We're always listening!


Give Yourself a Springtime Hydrating Facial At Home in 5 Easy Steps


So, I've recently been on a crusade to restore my skin to it's former glory. The past few months I've noticed it just hadn't been looking as dewy. Not one to take excuses, I set out to get down to figuring this out. Life is too long for shabby looking skin-- especially at my age. Although, I must confess I had not been drinking nearly enough water of late, and that's an inexcusable fact. I tried to blame my lackluster glow on a new climate and water that my skin's not used to. But if I'm being honest, my skin wasn't in the best condition even before then-- and that's in spite of summer's balmy atmosphere (yes, it's been that long).

My aha moment came after a nasty bout of the stomach flu several weeks ago. I didn't want to eat or drink much for the obvious reasons, but the one thing I found myself periodically sipping on, and I do mean sipping, was Gatorade. Imagine my surprise when I went to get in the shower the next day and caught a glimpse of myself looking quite the opposite of stir-fried poo. It was like magic. Not only did my skin seem to be glowing, but my pores were extra tight. I was shocked. Now, I know what you're thinking, Gatorade is not the ideal au natural, holistic beauty remedy for great skin. And trust me:

a.) I don't do Gatorade. If I tried hard enough I can probably accurately conjure up the number of times I've ever had any in the past. However, I was bedridden, and that's what was offered to me. And that's typically how ever other instance of me drinking Gatorade has occurred over the years.

Aaaand...

b.) You know as soon as I was in my right mind again I hopped online to find a natural, homemade version. I actually came up with some interesting results, but in the end I decided to go with what I already knew is great for hydration-- coconut water.  

Nevertheless, here is the routine that I came up with over the course of the past several weeks of trying different things out, which I feel has helped restore my sad, ashened looking skin-- just in time for spring. YAY! If you're like me and in need a hydrating boost-- our prayers have been answered. And the slay Gods are rejoicing!!

Step 1: Cleanse

Find yourself a good, mostly natural cleanser (if not completely). A few of my faves that I keep in rotation are Neutrogena Naturals, Black Soap, or Yes to Tomatoes Gel Cleanser. Also, when in harsh winter climates, Yes to Blueberries has a nice cream based cleanser that is also pretty fantastic.


Step 2: Clarify

Here's a little treat that I've been using to clarify my pores of late. It's GlamGlow's Youthmud Tinglexfoliate Treatment, available here. Now, although I've been using this on and off for some months, I haven't quite built up to committing to a whole jar that retails at $69 in Sephora.

However, I have been enjoying the abundance of samples that are readily available for FREE99 whenever I run out. Ya dig!? I assume that one day, like most products that I sample for a while, I'll suddenly decide I can't live without it and break down and buy it. But for now, the way my budget is setup... you know the rest. Lol.

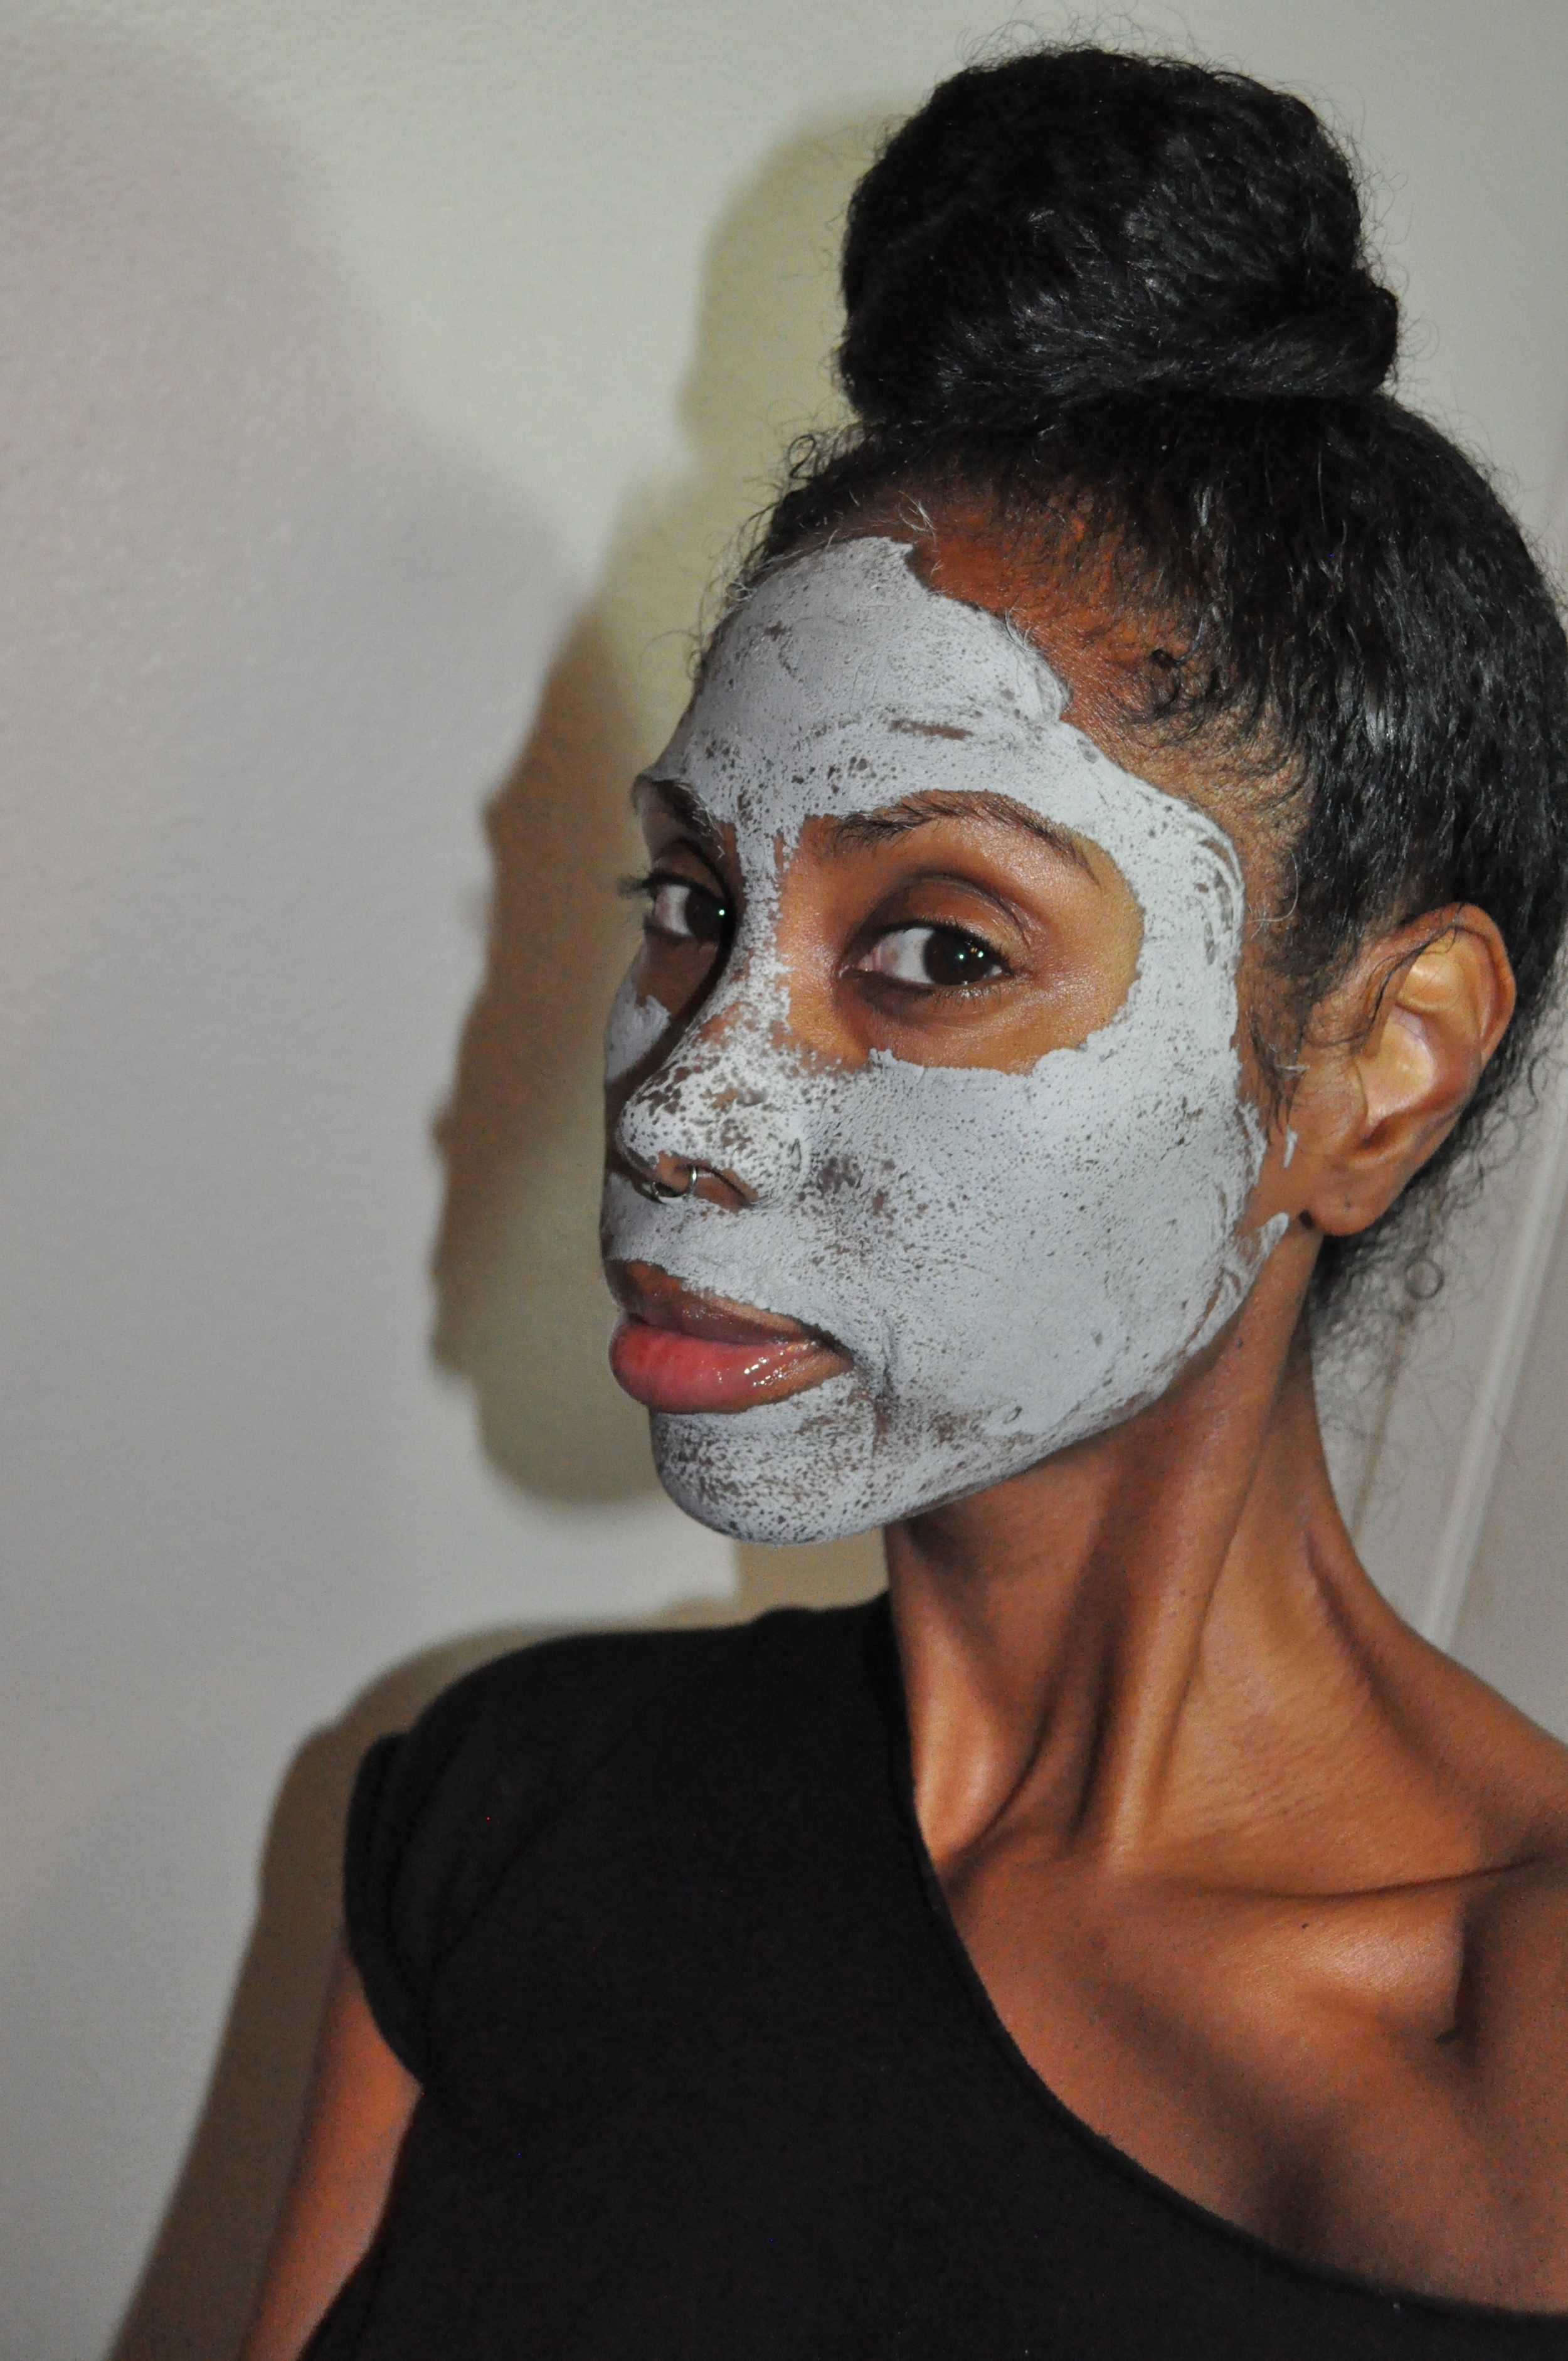
What I love about this mask is that not only does it seem to purify the pores, but do you see the little dots all over my t-zone? Well, those are supposedly my "problem areas," made evident using a (patented?) mud technology. When I began testing my theory of this hydration routine, I'll admit there were lots more dots the previous week than here (which was week 2). Full disclosure: In between weeks I'd gone to the aesthetician and gotten a hydrating facial, just to compare methodology of how professionals do things. And in week 2 I started to see a vast improvement. Like I said, I've been on a mission to right these dry skin wrongs. When I commit, I go all the way in.  


Step 3: Hydration Mask

Now this is what I consider probably the most important step after cleansing. While it's awesome to have the benefit of a clarifying mask (or at the least a clarifying cleanser), the thing about both is that they can be drying, which I mentioned several times before, I was working to eradicate. Therefore, I felt it was necessary find and add a good hydrating mask into the routine.

When I think back on all the facials I've had done by aestheticians over the years, the one thing each experience had in common was that the masks used at the spa were never the kind that dried up and hardened. Like ever. Total lightbulb moment. In fact, even if they were exposed to open air and over time (say, 15 minutes) were allowed to dry out because of their make up, at the spa they always took care to either use a light steam over the face during and after mask application. Sometimes they applied a warm, moist towel, or some other type of applique so that the mask never had the opportunity to dry and get hard. Other times, they avoided using masks that had a propensity to harden in general... such as the one here.

A few days after my hydrating facial at the spa, I went into Lush and explained my issue and asked for a recommendation and this is what I walked out with. Best 7-8 dollars I've spent this year. I love this stuff. The one and only drawback is that because it doesn't have a bunch of preservatives (yay) the expiration to use it is 3 weeks tops with refrigeration, Bummer. However, it did encourage me to use it often to make sure I was getting my money's worth. 


Step 4: Tone

Toner is a pretty big deal when it comes to prepping the skin for your moisturizer. This is after you've rinsed off the mask in step 3, of course. I always knew toner helped lift dirt without over drying, but I was reminded of how great toner is to retain moisture when, in a pinch, I used it to remove some matte lip stains I swatched during my recent pre-spring mini-haul. 

The woman who did my facial the other week used a wonderful smelling toner which reminded me a lot of Thayer's Rose Witch Hazel. I'm currently using the original formula, simply because I grew impatient looking for the rose kind when I ran out. So, when working on building hydration into a routine, I'd say go with witch hazel to up the moisture ante.


Step : 5 Moisturize With Coconut Oil

Finally, it's coconut oil for the win. You guys, I swear by this stuff on everything. My face, my hair, my nails, my food. I put it on pretty much everything. No exaggeration. The brand I use is sold at my local Trader Joes for just 5.99 for a 16 fluid ounce jar. This is my moisturizer of choice... maybe coco or shea butter is your jam, but I've used coconut oil consistently for the past 5 years. Actually, before that I was a coco butter lover. I just know what's working for me currently. And if it ain't broke... you know the rest.   


So, that's it. My 5 easy steps for an at home facial hydration routine. Give it a whirl and let me know what you think in the comments or on social. Love ya like XO!!!

4 Beautiful, Bright Lip Colors Worth Obsessing Over This Spring

Springtime is on her way and I'm totally in love with the new(ish?) line of Vivid Matte Liquid color from Maybelline. While lip gloss has long been my first love, bright, saturated lip colors and stains and I have become fast friends. I think that's why I'm incredibly partial to this line... it goes on shiny like a gloss, gets satiny, then after some wear mattifies like a true stain. What I appreciate the most is that it doesn't seem to dry out the lips during and after wear like some mattes seem to do.   

I'd already been using and loving one of the colors from the fall/winter collection that you can check out here. However, when I caught a glimpse of these brights, I couldn't resist them. All of them. I'd been looking for replacements for my previous go-to drugstore faves from the Wet N Wild Fergie collection. And these babies, I'm convinced, are it. I'm sure there are a few more colors out there for me, but these four were the only ones in stock, so I grabbed them up immediately.      

This first color is Pink Charge, which I was slightly concerned would look a little too pale for my taste without the use of a lip pencil. However, it's the most neutral of the four I have, and it was the one I popped open immediately after leaving the store. I'm pretty sure this will be one of my go-to colors when I want to keep a low profile. I didn't use a pencil in any of the swatch photos here to show the true color-- but in the future I'll probably pair this particular one with a brown pencil.

A few notches up the color scale is Electric Pink. For some reason a smokey eye is calling out to me with this lip color. Although I seldom have an occasion for a smouldering look these days, I'm almost always in the mood for color, highlighter or bronzer and mascara. This is actually one of my signature looks when I want to appear like I put some effort into my look for the day. I don't know about anyone else, but there's something about winged eyeliner (especially when I get it right in less than 3 tries) that makes me feel like I've really got my shit together. Today took multiple tries, however, lol. I really wanted to be cute for y'all today.

 
2016-02-20 21.58.06.jpg

Color #3 is Fuschia Ecstacy. I think this might've been my favorite of all the colors. I actually thought it read a bit more on the red side off camera, but after looking at the pictures I thought maybe it's just my imagination. Either way, I'll definitely be rocking this color, hardcore and with regularity.  

Last but not least is Orange Shot. I was excited about the potential of this color because it looked more orange-y in the bottle, but it looked more brick red. Now, I'm always here for a good red, especially after that Nars teaser that Sephora gave away for everyone's b-day last year. But I honestly have to be in the mood for red. Today was not really a red day for me, per say, but I went with it. After swiping off the other colors for demonstration purposes, it felt wasteful to do the same to this one just because I wanted to go back to the fuschia.

Nevertheless, I got quite a few compliments in the market today. I actually put on my red specs before leaving out, and in comparison, the color definitely looked more on the orange side. So there's that. In all, I'm very happy with my new colors, and will be on the lookout for any of the others I might be missing from the collection. 

So what new hues are you obsessing over? Drop me a comment below or on social... see ya around!!!

Sassy Style Files: Day Trippin' in The San Francisco Bay-- 3 Climates, 1 Outfit

Black Radiance BB Cream, Chocolate + Maybelline Dream Fresh BB Cream, Deep; Black Radiance Artisan Baked Blush, Raspberry; All Over Glow Bronzing Powder, Flushed Glow; NYX Matte Lipstick, Aria; Maybelline Vivid Matte Liquid, Possessed Plum; Black Ra…

Black Radiance BB Cream, Chocolate + Maybelline Dream Fresh BB Cream, Deep; Black Radiance Artisan Baked Blush, Raspberry; All Over Glow Bronzing Powder, Flushed Glow; NYX Matte Lipstick, Aria; Maybelline Vivid Matte Liquid, Possessed Plum; Black Radiance Liquid Liner, Black. Maybelline Great Lash, Blackest Black. Shop this look here!   

In true California style, the weather was stunningly beautiful for mid-February this past holiday weekend.

I made plans to go commune with nature and visit the redwoods, and I don't think I could've picked a better day. It was nearly 80 degrees where I started the day off, hence the sandals and bright fuschia afro baby tee with fatigues. This is a little number I dubbed my "gangster of love" outfit, lol. Although these heels are not at all practical for hiking, I couldn't resist letting my feet get some sun action before pulling on my motorcycle boots later in the day.


With champagne, fruit, cheese, wine, and caprese sandwiches in tow, we began to make our way towards Marin county. We decided to take the scenic route through the city which, of course, resulted in a slight detour at the Golden Gate. The breeze was just enough to keep us from breaking a sweat on our stroll across the bridge. But it was definitely warm enough that I wished I'd opted to wear my pink flip flops instead. 

IMG_7750 (1).JPG
"Baby hair was pumpin', lip gloss was shinin'"

"Baby hair was pumpin', lip gloss was shinin'"

By the time we made it to Muir Woods it was pretty late in the afternoon and the sun was barely peeking through the tops of the branches. As a result there were only a few places that were lit well enough to get some good photos.

The woods were so majestic and ethereal that I felt terribly underdressed. A fairy nymph-style shimmery, off the shoulder ball gown would've been far more appropriate. Next time, maybe.


And finally, unexpectedly... the beach!

Nail color: Julep Maven

Nail color: Julep Maven

On a whim, we decided to hit up Muir Beach. We made it just in time to catch a brilliant sunset and pop that bottle for mimosas. And thank goodness for the kindness of strangers who let us take over their fire pits as they were leaving and bequeathed us their logs. This night surely would've ended much sooner and on a far colder and less whimsical note.

Hope your weekend was full of fun & love... have you had a chance to listen to the Sexy is the New Sassy V-Day Playlist I made for you yet? Well... what are you waiting for? Check it out here.

Follow @TheSassyNation adventures on Snapchat.


Get Right For The Summertime and Show Your Feet Some Love

Before You Put on Another Sandal …

You Must Try Baby Foot

image

Summertime is upon us and that means it’s time for bare feet, and pedicures– oh, and sandals– you know if you’re into that sort of thing. Personally, I prefer to be barefoot as much as possible during the summer. This is why Baby Foot (my affiliate link) is quite possibly the best thing that could’ve happened to my feet.

It’s literally magic in two plastic booties. Although it takes about 5-10 days to really see progress. And by progress, I mean skin that peels like an anaconda. It’s literally a glycolic peel for your feet. Genius!

The process was really quite simple. First you soak your feet in warm water

image

Next, put on and secure the plastic booties that come in the kit. Get comfy with some wine and Netflix and rest your heels for about an hour. Not too much wine though, or you’ll fall asleep on the couch like I did for two solid hours (YIKES), and wake up terrified that your feet have melted off.

image

Finally, head back to the tub to completely rinse off the product (I used a mild soap after rinsing), and wait for the magic to happen. In my case that meant going to bed. Yay for sleep!

And then you wait. And you wait. And days later you start to wonder WTH is happening and say to your feet, skin, why you no peel?

I was so anxious the first few days; I couldn’t figure why it seemed to be taking so long for the shedding to start. I realized, you have to give the new skin time to regenerate below the surface of the old. And boy oh boy, once it started, my skin was flaking off day and night. Of course, I helped the process along, picking at and peeling off skin at every available opportunity. 

{Warning: not cute, but oddly fascinating picture below}

image

Much to my amusement, it was an Elmer’s glue lover’s childhood dream (yet way cooler– flicking and leaving evidence of my DNA everywhere). Also, the box doesn’t mention this, but it was suggested to me to soak my feet nightly once the peeling commenced to help loosen the skin. I found myself looking forward to my nightly ritual of showering, grabbing a glass of vino, then soaking and peeling skin in my tub. However, towards the end of the process the peeling on the tops of my feet seemed to take forever to come off.

It didn’t help that my nails are pretty long so I couldn’t really get a grip on the thinner, top flaking skin, which of course annoyed me. Not to be deterred, every evening I went after the rogue skin with a washcloth. I didn’t want to use anything too abrasive that might’ve damaged the precious new skin underneath (which, no lie, was actually turning out to be baby soft). That worked okay. In the end I finally pretty much gave up and let nature do it’s thing. I let the rest slough off naturally. Also, you’re not supposed to use lotion during the process. That allegedly delays the regeneration process. This was a point that I had serious concerns about. Ashy and peeling feet was not something I was looking forward to. Luckily, my concerns were unfounded. There wasn’t a patch of ash in sight the whole time. In fact, my feet haven’t been very ashy ever since. Of course I’ve resumed moisturizing them. And they’re still pretty darn soft like a baby.

In all, I’d say it took a full two weeks for all of the dead skin to go away. That includes the 4-5 day incubation period before the shedding actually started.

image

Overall, I enjoyed the after effect of using Baby Foot (which they have NOT paid me to say– I purchased and used the product on my own and you can too with my link here). However, I’m not a very patient person, so waiting it out for two weeks– especially right around Memorial Day– was probably not ideal. I would definitely use this product again, maybe once per season. Until then, I’ll be frolicking around in the grass with my flower crown and spreading the good word to those I think need it most. I know some guys who could DEFINITELY benefit from some baby love on those toes.

Leave a comment below. Have you or would you try a peel for your feet or some other exotic treatment like a fish pedicure?

Sharing is caring… tell a friend, tell your man. Let’s have baby soft feet together.